Honing Your Photo-Sharpening Skills
A while back I read an article on gimpedtutorials.com called How to Make Images Super Sharp in Gimp 2.8. It's a shame this tutorial no longer exists because it contained some really useful techniques. Fortunately, I saved a list of the steps and have been using one of the methods fairly often to sharpen my photos. The nice thing about this method is that it involves using new layers and layer modes and doesn't make any changes to the original image. It's also easy to adjust the sharpness by simply sliding the layer opacity up and down until I like what I see.
I'll use this photo of fuzzy little prairie dogs to illustrate the steps for sharpening an image.
 |
| Psst! Hey! Look at that! |
Step 1 – Create a Blurred Copy
First, duplicate [1] the image onto a new layer [2], make sure the new layer is active (I named my new layer blur21), then blur it using Filters > Blur > Gaussian Blur [3]. Enter a blur radius [4] that blurs the image a medium amount. The preview window will help you see how blurry the final image will be. I've chosen 21 pixels for both the horizontal and vertical size.
Step 2 – Extract the Grain
Next, set the Layer Mode of the blurred layer to Grain Extract [5]. In order to make further use of the resulting image, you need to make a copy of it. Do this by right-clicking in the Layers dialog and selecting New from Visible [6]. This will create a new layer named Visible.
Step 3 – Merge the Grain
Finally, merge the grain onto the original image. You can hide the blurred layer or delete it to get it out of the way. Then change the Layer Mode of the Visible layer to Grain Merge [7]. An Opacity setting of 100.0 is usually way too much sharpening. I generally lower the opacity to somewhere between 20 and 40 [8]. You can toggle the eyeball [9] off and on to compare the sharpened image to the original while you adjust the opacity to where you like it. Depending on your artistic intent, you might want to use a really low opacity for a hint of sharpening (subtle often being better than obvious); or, you might want to use a really high opacity for a strong impact.
Comparing Levels of Blur and Opacity
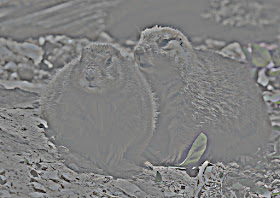
You might be wondering how to decide how much to blur an image to get the level of sharpening you want. First, let's take a look at the grain that is extracted for different blur radii. For reference, the prairie dog photo is 1130 x 800 pixels.
 | |
| Extracted Grain for Blur Radius 11 |
 |
| Extracted Grain for Blur Radius 21 |
 |
| Extracted Grain for Blur Radius 31 |
 |
| Extracted Grain for Blur Radius 41 |
Notice that with a small radius you see mostly fine detail and with a large radius you see mostly coarse detail.
Now lets look at some examples that illustrate the differences in sharpening among a couple of the radii shown above with a couple of different opacity settings.
 |
| Blur 11 Opacity 35 |
 |
| Blur 11 Opacity 70 |
 |
| Blur 41 Opacity 35 |
 |
| Blur 41 Opacity 70 |
Notice how the greater the blur, the sharper (or coarser) the image looks. But this is at the expense of subtle details. If you compare the eye of the right-hand prairie dog in the Blur 11 Opacity 35 image to the one in the Blur 41 Opacity 35 image you'll see that the subtle shading of the eye in the former is lost in the total blackness of the eye in the latter. This is why I generally prefer the subtle approach of a low to medium blur with a low to medium opacity.
Conclusion
As you can see, this process is very simple and will allow you to quickly sharpen any photo to whatever level of detail you desire without affecting the original image, and will also let you make further adjustments in the future if you so desire.


Yes, you can always make a copy. It's not that it's important, it's just that it's nice in case you're the type of person who tends to forget to make copies. Also, some people don't like to do anything that touches the original image. I think it's just a matter of preference.
ReplyDeleteHalf the time I can't even find the original!
ReplyDeleteOuch! :)
ReplyDeleteI think this is pretty much a manual method of doing a high-pass filter, isn't it?
ReplyDeleteI have no idea. I've heard of high-pass filters, but I don't know anything about them. Remember, I'm still in the newbie phase. :)
ReplyDeleteI've been experimenting and found that keeping the opacity below 40 after the last step eliminates any haloing, even after using high blur radiuses (radii?).
ReplyDeleteCool. That's good to know.
ReplyDeleteIn view of finding the description of that method on various websites, I am sure it would work. However, I just cannot find the layer mode to grain extract in my GIMP 2
ReplyDeleteIn GIMP 2.6.x and 2.8.x, you should be able to click on the Mode field in the Layers list and see a drop-down box that lists all the layer modes. I can't comment on any earlier GIMP versions. I don't know when Grain Extract first appeared in GIMP.
ReplyDelete