In this article I discuss the following layer modes: Darken only, Multiply, Burn, Overlay, Soft light, Hard light, Difference, and Subtract.
I will use the same test images I used for Part 1.
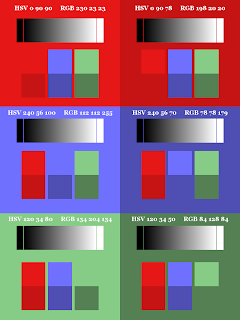 |
| Color Patterns on Color Blocks |
|
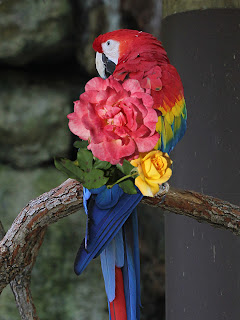 |
| Roses on Macaw |
|
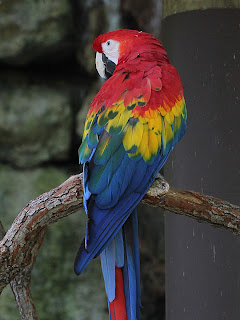 |
| Macaw |
|
 |
| Grayscale Gradient |
|
For each of the test images, I changed the layer mode of the upper layer to each mode and saved the result. I've included these images in each section below as references. What follows are my observations and thoughts about how to use each layer mode. Feel free to copy any of these images to your desktop so you can load them into GIMP for a closer look.
The layer modes are presented in the order in which they appear in the Mode drop-down menu. Here's a full list with quick links.
The
result of using Darken only is determined by
taking the smallest value of each of red, green, and blue from the
initial colors. For example, if an RGB of 78, 78, 179 is combined
with an RGB of 134 204 134, the result is 78, 78, 134. Since pure
black is 0, 0, 0 and pure white is 255, 255, 255, taking the lowest
numbers makes the resulting color darker. Since there is no attempt
to maintain the hues of the two initial colors, the resulting hue can
be quite different from either. However, if one layer is grayscale
and the other is color, the effect of Darken only is to
both darken and desaturate the color layer while not affecting the
hue, except in the case where a pixel will become gray if the shade
of gray overpowers the color. That is, if you look at the HSV
numbers, the hue doesn't change until it pegs at 0, but the
saturation and value do.
 |
| Color Pattern; Mode Darken Only |
|
 |
| Photo Overlay; Mode Darken Only |
|
Observations:
It
does not matter which layer is on top.
Black
results in black.
White
has no effect on the result.
A
color darkened against itself has no effect.
Shades
of gray serve to darken the other color. Darker shades of gray
darken more. Lighter shades of gray darken less.
If one
layer is grayscale and the other is color, the effect of Darken
only is to darken the color layer without, in general, affecting
the hue. However, depending on the combination, the result may be
some shade of gray.
Color
on both layers results in a darkening, plus a possible change in
hue.
The
darkening power of Darken only is not as intense as
either Multiply or
Difference.
Thoughts:
- Use
Darken only with a grayscale layer and a color layer for darkening and desaturating the color layer without affecting the hue (in general), keeping in mind that if a gray pixel has smaller red, green, and/or blue values than the corresponding color pixel, then the resulting pixel will tend toward being gray.
 |
Macaw + Grayscale Gradient;
Mode Darken Only; Opacity 50% |
Multiply
is a
layer mode that darkens the image. According to the
user's manual, the values of each pair
of corresponding pixels are multiplied, then the result is divided by
255. If one layer is grayscale and the other is color, Multiply darkens the color image without (or with only minimally) affecting hue and saturation.
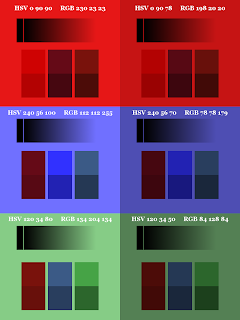 |
| Color Pattern; Mode Multiply |
|
 |
| Photo Overlay; Mode Multiply |
|
Observations:
It
does not matter which layer is on top.
Black
results in black.
White
has no effect on the result.
Shades
of gray serve to darken the other color. Darker shades of gray
darken more. Lighter shades of gray darken less.
If one
layer is grayscale and the other is color, the effect of Multiply
is to change the value part of the HSV triplet. Hue and saturation
either don't, or only minimally, change.
Color
on both layers results in a darkening. Depending on which color is
dominant, the result may be a darker color of the upper layer or a
darker color of the lower layer.
The
more similar the two colors are, the more the saturation changes.
The
more dissimilar the two colors are, the more the hue changes.
The
darkening power of Multiply is more intense than Darken
only and
retains colors better. Its
effect is not as dark as
Difference, but
it is more saturated.
Thoughts:
Use
Multiply with a grayscale layer and a color layer to darken
the color layer without changing (or with only minimally changing)
hue and saturation.
Use
Multiply on the upper layer of a duplicated image and vary
the opacity to adjust darkening of the lower image without affecting
the hue and saturation.
 |
Macaw + Grayscale Gradient;
Mode Multiply; Opacity 50% |
|
 |
Macaw Duplicate;
Mode Multiply; Opacity 50% |
|
See the following articles for examples that use Multiply mode:
Burning is a photographic printing technique that increases the exposure for areas of the print that the photographer wishes to be darker. When examining the result images, I noticed that Burn decreases the values of red, green, and blue below both of the initial values. According to the user's manual, the value of each pixel on the lower layer is inverted. The result is then multiplied by 256 and divided by the value of the corresponding pixel on the upper layer plus 1. That result is then inverted. If one
layer is grayscale and the other is color, the effect of Burn
is to darken the color layer while increasing the saturation, but not affecting the hue until it gets
to black.
 |
| Color Pattern; Small Blocks on Top; Mode Burn |
|
 |
| Photo Overlay; Mode Burn |
|
 |
Color Pattern; Small Blocks on Bottom; Mode Burn
(Gray background represents transparency.) |
|
|
Observations:
It is
important which layer is on top.
White
on the upper layer has no effect.
White
on the lower layer results in white.
Black
on either layer results in black.
A
color burned against itself has no effect.
If one
layer is grayscale and the other is color, the effect of Burn
is to darken the color layer without affecting the hue until it gets
to black. That is, if you look at the HSV numbers, hue does not
change until it pegs at black.
The
saturation of colors increases dramatically.
Color
on both layers results in a darkening. Depending on which color is
dominant, the result may be a darker color of the upper layer or a
darker color of the lower layer.
Dark
colors on the lower layer have a much stronger darkening effect than
dark colors on the upper layer.
Burn
results in more vivid colors than Darken only or Multiply,
though its darkening ability and the resulting hues vary depending
on which layer is on top.
Thoughts:
Use
Burn with a grayscale layer and a color layer to increase the saturation of and darken the
color layer without changing the hue (unless it goes to black).
Use
Burn on the upper layer of a duplicated image and vary the
opacity to adjust saturation and darkening of the lower image without affecting the
hue (unless it goes to black).
 |
Macaw + Grayscale Gradient;
Mode Burn; Opacity 50% |
|
 |
Macaw Duplicate;
Mode Burn; Opacity 50% |
|
Exercise 1:
Here's
something interesting to try. Duplicate a color image. Gaussian blur
the upper layer by 11. Set the layer mode to Grain extract.
Right-click in the Layers dialog and select New from Visible.
Delete the blurred layer. Set the layer mode of the Visible
layer to Burn and adjust the opacity to around 20%. Click the
eye of the Visible layer off and on to see how this effect
sharpens, darkens, and saturates along all the edges in the image.
 |
| Macaw + Burned Grain Extract; Opacity 20% |
Exercise 2:
Another technique that might yield an interesting effect is to duplicate a color image, convert the duplicate to grayscale (Colors >
Desaturate, Luminosity), invert the grays (Colors >
Invert), and change the mode of the duplicate layer to Burn.
 |
| Macaw + Burned Inverted Grayscale; Opacity 100% |
Overlay mode appears to be fairly complex, and can result in either a lightening or a darkening on a pixel by pixel basis. It can be used to either superimpose the image of the upper layer onto the image of the lower layer, to color a grayscale layer, or to improve the saturation and contrast of an image duplicated over itself. (See the user's manual for the equation.)
 |
| Color Pattern; Small Blocks on Top; Mode Overlay |
|
 |
| Photo Overlay; Mode Overlay
|
|
 |
Color Pattern; Small Blocks on Bottom; Mode Overlay
(Gray background represents transparency.) |
|
|
Observations:
It is
important which layer is on top.
Black
on the lower layer results in black.
White
on the lower layer results in white.
Pixel
colors on the lower layer have a much stronger effect than pixel
colors on the upper layer. Think of the upper layer as mildly
suggesting its colors onto the lower layer.
If the
upper layer is grayscale and the lower layer is color, then the
result gets its color from the color layer. Lighter grays decrease
the saturation and increase the value. Darker grays increase the
saturation and decrease the value.
If the
upper layer is color and the lower layer is grayscale, then the
result gets its color from the color layer. Lighter grays on the
lower layer pull the value of the color layer down a little and the
saturation of the color layer down a lot. Darker grays on the lower
layer pull the value of the color layer down a lot and the
saturation of the color layer down a little.
If
both layers are color, the result is a combination of the two
colors, with the lower layer having dominance. The saturation and
value of the result will be a minor change from those values of the
lower layer. The hue of the result could be close to that of the
lower layer, or could be quite different from both layers.
Red on
the lower layer appears to have a dominating effect. Blue has a
medium effect. Green has the least effect.
Thoughts:
Use
Overlay with a light gray or white upper layer over a color
layer to lighten and desaturate the colors in the lower layer.
Use
Overlay with a dark gray or black upper layer over a color
lower layer to darken and saturate the colors in the lower layer.
Use
Overlay with a color upper layer over a grayscale lower layer
to color the lower layer. (For example, either a solid color upper
layer or an upper layer with various colored sections over a
grayscale image.)
Use
Overlay on the upper layer of a duplicated image and vary the
opacity to adjust the saturation and contrast effects.
 |
Macaw + Grayscale Gradient;
Mode Overlay; Opacity 50% |
|
 |
Macaw Duplicate;
Mode Overlay; Opacity 50% |
|
See the following articles for examples that use Overlay mode:
According
to the user's manual,
Soft light mode uses the result of the equation for Screen
mode and ends up with a result similar to Overlay mode, and is
even the same as Overlay mode in some versions of GIMP. Based
on my observations, Soft light and Overlay result in
essentially the same effect in GIMP 2.8.6. The only difference I
noticed was one value point in one color with the color patterns
below the color blocks. (For Overlay I got HSV 353, 91, 76.
For Soft light I got HSV 353, 91, 75.)
 |
| Color Pattern; Small Blocks on Top; Mode Soft Light |
|
 |
| Photo Overlay; Mode Soft Light |
|
 |
Color Pattern; Small Blocks on Bottom; Mode Soft Light
(Gray background represents transparency.) |
|
|
Observations:
See my observations for Overlay
mode.
Thoughts:
 |
Macaw + Grayscale Gradient;
Mode Soft Light; Opacity 50% |
|
 |
Macaw Duplicate;
Mode Soft Light; Opacity 50% |
|
I normally use Soft light mode for spotlighting, which is when you create a transparent layer above an image and use the Blend tool with a Radial shape and a Foreground to Transparent gradient and the color white to create a circular white gradient over a part of the image that you want to highlight, adjusting the opacity as necessary. I usually use this method to highlight eyes. Overlay mode would work as well.
See the following articles for examples of using Soft light mode.
The effect of Hard light is very dependent on the colors involved. According
to the user's manual,
the equation for Hard light mode depends on the pixel color of the upper layer.
 |
| Color Pattern; Small Blocks on Top; Mode Hard Light |
|
 |
| Photo Overlay; Mode Hard Light |
|
 |
Color Pattern; Small Blocks on Bottom; Mode Hard Light
(Gray background represents transparency.) |
|
|
Observations:
It is important which layer is on top.
Black on the upper layer results in black.
White on the upper layer results in white.
If the
upper layer is grayscale and the lower layer is color, then the
result will have some color where the mid-tone grays are, but will
be mainly black or white at the extremes.
If the
upper layer is color and the lower layer is grayscale, then the
result will be a saturated and darker color for combinations with
dark grays and black, and a desaturated and lighter color for
combinations with light grays and white.
If
both layers are color, red has
a dominating
effect, blue has a medium effect,
and green has the least effect.
Colors on the upper layer have a more dominant effect than colors on the lower layer.
Two
similar colors (e.g.,
light red and dark red) increase
the saturation.
Two
dissimilar colors (e.g., red and
green) cause a large
change in hue.
Thoughts:
Use Hard light on a color upper layer over a grayscale lower layer to selectively lighten some areas, darken other areas, and affect the saturation of the color.
Create a grayscale copy of a color image as the upper layer and set its mode to Hard light to affect the saturation and tone of the color image.
Use Hard light on the upper layer of a duplicated image to increase the saturation and improve the contrast.
 |
Color over Grayscale Gradient;
Mode Hard Light; Opacity 100% |
|
 |
Grayscale Copy over Color;
Mode Hard Light; Opacity 50% |
|
 |
| Macaw Duplicate; Mode Hard Light; Opacity 50% |
|
|
See the following article for an example of using Hard light mode:
The
Difference layer mode subtracts the smaller pixel value from the larger pixel value, thereby darkening the image. For example, if one pixel is RGB 230, 23, 23 and the other is RGB 78, 78, 179, the result is RGB 152, 55, 56.
 |
| Color Pattern; Mode Difference |
|
 |
| Photo Overlay; Mode Difference |
|
Observations:
It
does not matter which layer is on top.
Black
has no effect on the result.
If
both pixels are the same color, the result is black.
If one
layer is color and the other is grayscale, the medium to light grays
and white will result in
the complement of the color. Dark
grays and black have little to no effect.
Two
similar colors result in a very dark version of the color.
Two
dissimilar colors can
result in a wild change in hue.
The
results of Difference
mode are darker and less saturated than Multiply
and Burn,
and darker than Darken
only.
Thoughts:
Use Difference with a grayscale layer and a color layer to darken the color layer and invert the colors wherever lighter grays appear.
Use Difference on the upper layer of a duplicated image to darken the image.
 |
Macaw + Grayscale Gradient;
Mode Difference; Opacity 50% |
|
 |
Macaw + Grayscale Gradient;
Mode Difference; Opacity 100% |
|
 |
| Macaw Duplicate; Mode Difference; Opacity 50% |
|
|
Exercise 3:
For a possibly cool effect (depending on the image, of course), duplicate a color image, convert the upper layer to grayscale (Colors >
Desaturate, Luminosity), and change its mode to Difference.
 |
Grayscale Copy over Color;
Mode Difference; Opacity 100% |
Exercise 4:
Here's another fun effect. Keeping the two layers from Exercise 3, do the following:
Hide the grayscale layer.
Duplicate the color layer.
Blur the (upper) duplicated color layer. (Filters > Blur >
Gaussian Blur, 11.0)
Set
the mode of the blurred layer to Grain extract.
Right-click
and select New from Visible. Rename the new layer to “Grain”.
Delete
the blurred layer.
Set
the mode of the “Grain” layer to Difference.
Unhide
the grayscale layer.
The order of the layers from top to bottom should be grayscale, grain, and color image.
 |
Grayscale Copy; Mode Difference; Opacity 100%
Grain Extract; Mode Difference; Opacity 100%
Color Image |
See the following articles for examples that use Difference mode:
The
Subtract layer mode subtracts the RGB value of the upper pixel
from the RGB value of the lower pixel, bottoming out at zero. For
example, if the upper pixel is RGB 78, 78, 179 and the lower pixel is
RGB 230, 23, 23, the result is 152, 0, 0. This generally results in a
darkening, though, depending on the colors, it could result in a
slight lightening.
 |
| Color Pattern; Small Blocks on Top; Mode Subtract |
|
 |
| Photo Overlay; Mode Subtract |
|
 |
Color Pattern; Small Blocks on Bottom; Mode Subtract
(Gray background represents transparency.) |
|
|
Observations:
It
matters which layer is on top.
Black
on the upper layer has no effect.
White on the upper layer results in black.
Black on the lower layer results in black.
If both pixels are the same color, the result is black.
If the lower layer is grayscale and the upper layer is color, the medium to light grays and white will result in the complement of the color. Dark grays and black will
result in near black or black.
If the
lower layer is color and the upper layer is grayscale, the medium to
dark grays and black will result in a darker, more saturated,
version of the color. Light grays and white will result in near
black or black.
The
color on the lower layer takes precedence.
The
more similar the two colors are, the closer to black the result is
and the less the saturation is
affected.
The
more dissimilar the two colors
are,
the more saturated the result is.
The
results of Subtract mode are darker and less saturated than
Multiply and Burn, and darker and more saturated than
Darken only.
Depending
on what the two layers are, Subtract and Difference may
have a similar effect, a wildly different effect, or Subtract
may be lighter and more saturated.
Thoughts:
Use
Subtract with a grayscale upper layer and a color
lower layer to darken and saturate the color layer.
Use
Subtract on the upper layer of a duplicated image to darken
the image, adjusting the opacity as necessary.
 |
Macaw + Grayscale Gradient;
Mode Subtract; Opacity 50% |
|
 |
Macaw Duplicate;
Mode Subtract; Opacity 50% |
|
See the following article for an example that use Subtract mode:
If you have specific uses not mentioned here for any of these layer modes, please leave a comment. I'd love to hear about it.
See also:
GIMP's Layer Modes (Somewhat) Demystified – Part 1: Normal to Addition.
GIMP's Layer Modes (Somewhat) Demystified – Part 3: Grain Extract to Value
GIMP's Layer Modes (Somewhat) Demystified – Part 4: A Pictorial Comparison


No comments:
Post a Comment