GIMP Casual User Series — The Free Select Tool
Have you ever wanted to cut an irregular image out of a photograph, perhaps to put on a web page or use as part of a collage, but didn't know how to go about it or which tool to use? If so, read on for an exploration of GIMP's Free Select Tool.
For this tutorial I'll be using GIMP 2.8 and a photo of a yellow hibiscus flower, which you can download by clicking on the picture. (When you get to the full-sized image, drag it and drop it on your desktop.) It is assumed that you have some basic knowledge about GIMP, such as how to invoke it and load an image, how to navigate the menus, and how to save a file. By the end of this tutorial you should have a good feel for using the Free Select Tool to cut out images.
The Basics
Step 1
The first thing to do is cut the image down to a manageable size that includes only the part you want to cut out, plus a bit of a margin. You can use either the Rectangle Select Tool (shortcut R) [1] or the Crop Tool (shortcut SHIFT+C) [2] to do this. Choose one of these tools and drag out a rectangle around the flower [3], leaving a little bit of a margin on all sides. If you're using the Rectangle Select Tool, choose Image > Crop to Selection [4]; if you're using the Crop Tool, hit the Enter key.
You should now have an image similar to the following.
Step 2
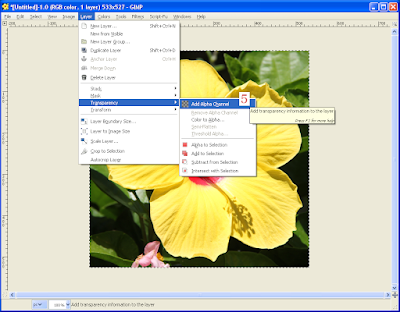
As you cut out the flower, you'll want the area around it to be transparent. Select Layer > Transparency > Add Alpha Channel [5] to add transparency to the image.
Step 3
Zoom in on the image using CTRL+Mouse Wheel Forward until you have a very close up view of an edge of the flower. You can use CTRL+Mouse Wheel Backward to zoom out, SHIFT+Mouse Wheel Forward to scroll right, and SHIFT+Mouse Wheel Backward to scroll left. Practice with these controls until you feel comfortable moving the image around since you'll be doing this a lot while cutting out the flower.
Choose the Free Select Tool (shortcut F) [6]. The final image will look best if you cut just to the inside of the edge of the flower so that there's no transition to the background color around the flower. Left-click at a spot on the edge of the flower [7], just inside where it changes from yellow to green. This will set a control point. Move your mouse a little along the edge and left-click again to set another control point [8]. Continue to set control points along the edge of the flower, using the mouse wheel and the CTRL and SHIFT keys to move the image as necessary. Notice that the control points seem to disappear as you move away from them. They will reappear as you move your mouse near them. If you don't like the position of a control point, you can click on it and move it. You can make the space between one control point and the next as close together or as far apart as you want. In general, if you're outlining a curve, you'll want the control points to be close together; and if you're moving along a straight edge, you can simply click at one end and then at the other.
Step 4
In order to finish the selection, you must make a circuit by finally clicking again on the point where you started. I find it easiest to cut the background out in chunks. After setting control points along part of the edge of the flower, zoom out until you can see the entire image, then set some control points around the outside of the image, making a loop that ends up back at the first control point [9]. You can press the arrow at either end of either scroll bar [10] to force the edge of the image to move into the window so you can click outside of the image.
Step 5
After clicking on the first control point again, the outline of the selection turns into "marching ants" [11]. Hit the Delete key. The image in the selected area will disappear and you'll see the checkerboard pattern that indicates transparency. You can remove the selection by choosing Select > None [12] or using the shortcut CTRL+SHIFT+A. If you have the mode Replace the current selection selected (see Mode options below), you don't need to remove the selection since the next selection will replace it.
Continue creating selections and deleting the background using the method outlined above. Remember to save your progress occasionally (CTRL-S).
Step 6
Once you feel you're finished, it's a good idea to check your work by adding a colored background, which will make it easier to notice if you've missed any spots. First, select a color by clicking on the Foreground & background color selector [13]. Choose a good complementary color that's likely to contrast with any part of the image you may have missed and click OK.
Then right-click in the Layers pane and select New Layer [14]. A dialog box will pop up, allowing you to give the new layer a name and adjust the width, height, and fill type. Choose Foreground color and click OK. If your new layer appears above the flower layer in the Layers pane, grab it with the left mouse button and move it down below the flower layer.
Zoom in on the image and scroll around, checking to see if you need to make any final adjustments [15].
When you're finished with your work, you can hide the color layer by clicking on the eye [16] or delete it by right-clicking on the layer and choosing Delete Layer [17].
You can use the Rectangle Select Tool or the Crop Tool to cut the image down a bit more if you like. Once you're happy with the look and arrangement of your image, use File > Export to save it to a PNG file. (JPG files don't work with transparency.)
The Options
Now let's take a look at the options for the Free Select Tool, which are displayed in the Tool Options pane, which is usually found in the Toolbox pane. If you don't see the Toolbox pane, select Windows > New Toolbox (shortcut CTRL+B) and resize the Toolbox pane to something useful. If you don't see the Tool Options pane, then select Windows > Dockable Dialogs > Tool Options. This will open a separate Tool Options pane. You can dock it in the Toolbox pane by grabbing the Tool Options tab inside the pane and dragging it to the lower section of the Toolbox pane.
Along the top of the Free Select Tool Options are four Mode buttons [18]: Replace the current selection, Add to the current selection, Subtract from the current selection, and Intersect with the current selection. Replace the current selection is selected by default and is what you would normally use. If, however, you're not satisfied with the selection you just made, you can add to it, subtract from it, or create an intersection with it by selecting one of the other three modes and drawing a new selection box. If you choose Add to the current selection, the next selection area you create does not have to touch the previous one. If you choose Subtract from the current selection or Intersect with the current selection, the next selection area you create must intersect at least somewhat with the previous area. Subtracting will remove the intersecting area. Intersecting will leave only the intersecting area.
The Antialiasing option [19], which is on by default, causes there to be a small amount of fade along the edges of the selection area. This will allow your final image to fade into whatever background you put it on. When the antialiasing option is off, the edge transition is sharp.
The Feather edges option [20] will add feathering (fading) along the edge of the selection based on the selected Radius, which is in pixels. When cutting out an image as described above, you might want to use this option with a low radius number if you think antialiasing is not adding enough fade.
The Alternative Methods
If you have a small image to cut out, or you have the time and patience to draw a selection area around an entire large image (such as the hibiscus flower), then there are a couple of other methods you can use once you have completed the selection.
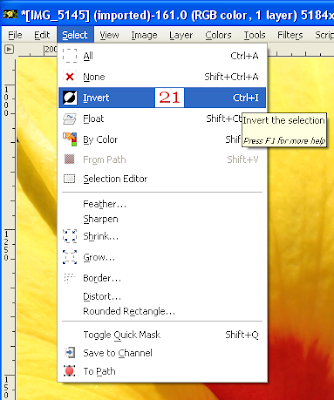
Inversion: You can choose Select > Invert (shortcut CTRL+I) [21] to invert the selection, then hit the Delete key to delete the entire background at once.
Copying: You can hit CTRL+C to copy the selected area, then CTRL+V to paste a new layer, which will appear in the Layers pane as Floating Selection (Pasted Layer) [22]. Right-click on the new layer in the Layers pane and choose To New Layer [23] to anchor the copy as a new layer. The image in this layer can then be exported to a raster (png) file. Make sure you hide or delete the original image before doing the export.
Continue experimenting with the Free Select Tool until you feel confident in your use of it. If you have any questions about this tool, please leave a comment or send me a message.
Related GIMP Articles
A Non-Destructive, Adjustable Method for Cutting Out an Image
Which Tool Should I Use to Crop a Photo? -- Part 1
Which Tool Should I Use to Crop a Photo? -- Part 2
Which Tool Should I Use to Crop a Photo? -- Part 3
Which Tool Should I Use to Crop a Photo? -- Conclusion


No comments:
Post a Comment