Contents ~ Posts ~ Free Images ~ GIMP 2.8 Shortcuts ~ Studio Dalio Gallery
Showing posts with label GIMP tools. Show all posts

04 September 2020

How to Create Regular Polygons in GIMP

I have noticed over time that there have been continual searches for "gimp hexagon". I have no idea in which context anyone is searching for this concept, but it inspired me to write a simple tutorial on how to create regular polygons in GIMP. For this tutorial I have chosen to show how to create a hexagon.

A hexagon consists of six sides of equal length. You can think of the hexagon as being composed of six equilateral triangles. Since each angle in an equilateral triangle is 60 degrees, the angle between two adjacent sides of a hexagon is 120 degrees. Keep this in mind during the instructions below.

10 July 2014

A Painting Tutorial by Evelyne Schulz

Many months ago I discovered Evelyne Schulz on Twitter due to a GIMP-related post. I immediately loved her artwork and, after some correspondence, she graciously agreed to write a tutorial about how she creates her digital paintings in GIMP. What follows is what she wrote about how she created her Warrior painting, with editing and inclusion of a description of the Palette Editor by me.


Warrior


23 April 2014

Four Ways to Draw a Border Around a Selection in GIMP

I was recently asked for a quick way to draw a border three pixels wide around the inside edge of a rectangular selection on top of an in-progress graphic design. Two methods immediately came to mind and a third occurred to me later that afternoon. I discovered a fourth method while writing this article.


Method 1


The most obvious method to use is Select > Border [1], which opens the Border Selection dialog [2]. This dialog contains three adjustments.

Border Selection Dialog

04 February 2014

Alignment and Distribution of Graphic Elements in GIMP

When creating graphic or typographic designs or laying out printed matter such as brochures, leaflets, or newsletters, knowing how to use GIMP to organize and move graphic elements can be very handy. In this article I will explore GIMP's alignment and distribution functions by creating a simple graphic design of colored circles.


Final Dot Graphic

11 October 2013

Question from the Audience – Sharpening a Selection

A Learning Experience


A reader asked me if it were possible to use the grain extract / grain merge sharpening technique on a selection. Taking the question literally and having never tried that before, I immediately opened GIMP and started experimenting. Let's go through the process of sharpening only the face of this African gray parrot and see what we learn.

African gray parrot
African gray parrot

03 October 2013

A Non-Destructive, Adjustable Method for Cutting Out an Image

The Black and White of Masking


In a previous tutorial I described a way to cut out irregular images using the Free Select tool. I used to use that technique frequently, but it's very time consuming, causes a lot of work for the left-mouse-button finger, and leaves a sharp edge unless either you remember to feather the selection before deleting the cutout area or you use the Blur or Smudge tool to soften the edge. It's also destructive to the image and, if you make a mistake, it's painful to fix it.

I have since switched over to using masks. Not only is a mask quicker and easier to use, it doesn't affect the original image, so recovering from mistakes is simple, and if you use a soft brush you automatically get blurred edges. You want blurred edges so that the cutout image blends smoothly into whatever it's in front of.

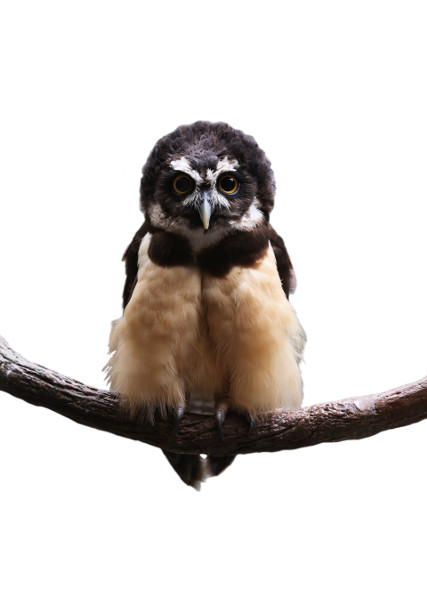
This tutorial describes how to create the following image using a mask to cut out the background.


Spectacled Owl with No Background
Let me give you my two hoots' worth.

25 September 2013

How to Create a Textured Background Using Color Functions and Bump Maps

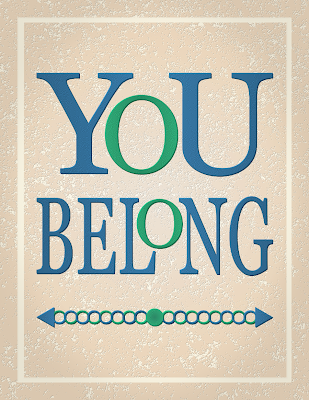
In a previous tutorial, I described a method of creating a background using overlays of various artistic GIMP filter effects. In this tutorial, I'll describe a method of creating a textured background with a 3D look, similar to the one in the following image, using a photo of some gray stone and various functions from the Colors menu combined with Bump Mapping.


You Belong Typographic Design


16 September 2013

How to Create Weathered Text on Wood

Let's say you want to create the look of text painted on a wooden board and you want the text to look like it's been out in the weather for a long while. There are several methods you can use to distress text. You can find some of them on the web by searching for “GIMP text”, plus one of the following words: weathered, distressed, worn.

This tutorial describes how to create the following image using a photo of a gray board, some text, and a photo of a rusty metal texture that is processed and turned into a layer mask. You can download the two photos (Weathered Gray Wood 0099 and Rusty Metal 0817) from the Free Images page of my blog.


Bear Foot Cabins Sign

17 July 2013

Changing Brightness and Contrast Without Affecting Saturation

A Color Experiment


A while back I was made aware of an article on DPReview.com entitled Reducing Contrast Without the ColoursFading (using GIMP) wherein Tom Axford talks about the need for reducing the contrast in or otherwise brightening an image to make it look better in print. His original technique involved using an HSV model to make adjustments to a value layer without affecting the saturation of the colors in an image.

Intrigued by the concept, I decided to perform an experiment to see exactly what effect brightness and contrast adjustments have on colors. I created three squares, one each of red, green, and blue — red being lighter, green being darker, and blue being of medium intensity.

Initial Colors

18 June 2013

Using Color to Define the Focal Point of an Image with GIMP

Making the Balloons Pop!


Have you ever wanted to emphasize a particular part of a photo to make it stand out against a busy background? This intermediate-level GIMP tutorial describes a technique whereby you create a zone of color surrounded by a grayscale background to focus attention on the area of interest.

Specifically, I'll describe how to create this image:

Colored Balloons on a Grayscale Background


21 May 2013

A Non-Destructive Adjustable Way to Sharpen a Photo

Honing Your Photo-Sharpening Skills


A while back I read an article on gimpedtutorials.com called How to Make Images Super Sharp in Gimp 2.8. It's a shame this tutorial no longer exists because it contained some really useful techniques. Fortunately, I saved a list of the steps and have been using one of the methods fairly often to sharpen my photos. The nice thing about this method is that it involves using new layers and layer modes and doesn't make any changes to the original image. It's also easy to adjust the sharpness by simply sliding the layer opacity up and down until I like what I see.

I'll use this photo of fuzzy little prairie dogs to illustrate the steps for sharpening an image.

Prairie Dogs - Original Photo
Psst! Hey! Look at that!

08 April 2013

How to Create Layered Text with a Shiny Highlight in GIMP

A GIMP Practice Exercise for Layers and Selections


I recently read an article called Shiny, Double-Beveled Text by Scott Kelby and Felix Nelson in the March 2004 issue of Photoshop User and thought it would be cool to reproduce the steps in GIMP as an exercise in translating Photoshop techniques into GIMP techniques. If you follow these instructions, you'll get some practice with creating and manipulating layers, using a mask on a layer, and creating and altering selections to achieve various effects.

One of the steps involves creating an outer glow. I describe a manual method for that, but if you already have a plugin that does outer glow you can use it instead.

The instructions below describe how to create this image:


02 April 2013

How to Replace the Sky in a Photo

A Simple GIMP 2.8 Tutorial


Have you ever had a nice outdoor picture of something, say a building, where the exposure on the building was good, but the sky looked drab, washed out, or overexposed, and you wondered what you could do to make the sky look better? You could replace the sky either with a simple solid blue color of the appropriate intensity or with a linear or radial blue gradient. Sometimes that's fine, but sometimes you'd like a different effect to make the image more interesting.

In this tutorial I'll describe a technique you can use to create this image:


Final Adjusted Sky

from this image:

Original Drab Sky


13 March 2013

How to Make a Pinwheel Pattern

A Gimp 2.8 Tutorial


A pinwheel is defined either as a toy that has a set of thin vanes that are arranged like a fan on the end of a stick and that spin like a wheel when air is blown on them, or as a type of firework that spins like a wheel. A pinwheel pattern is, similarly, a pattern that takes the form of vanes arranged regularly into a circular shape.

This novice-level tutorial describes how to create this pinwheel pattern.


Mallard Wing Pinwheel

from this vane-like image of a wing that was cut from a photo of a Mallard duck.

Mallard Wing


28 January 2013

GIMP 2.8 Tutorial: Which Tool Should I Use to Cut Out an Irregular Image?

GIMP Casual User Series — The Free Select Tool


Have you ever wanted to cut an irregular image out of a photograph, perhaps to put on a web page or use as part of a collage, but didn't know how to go about it or which tool to use? If so, read on for an exploration of GIMP's Free Select Tool.

Hibiscus Flower Original Image

For this tutorial I'll be using GIMP 2.8 and a photo of a yellow hibiscus flower, which you can download by clicking on the picture. (When you get to the full-sized image, drag it and drop it on your desktop.) It is assumed that you have some basic knowledge about GIMP, such as how to invoke it and load an image, how to navigate the menus, and how to save a file. By the end of this tutorial you should have a good feel for using the Free Select Tool to cut out images.

03 December 2012

GIMP 2.8 Tutorial: Which Tool Should I Use to Crop a Photo? — Conclusion

GIMP Casual User Series — Comparison of Photo Cropping Tools


This is the final article in the series about which tool to use to crop a photo. If you've been following along, you'll have seen that there are three tools that can be used in GIMP to crop photos: the Crop Tool, the Rectangle Select Tool, and the Ellipse Select Tool.

27 November 2012

GIMP 2.8 Tutorial: Which Tool Should I Use to Crop a Photo? — Part 3

GIMP Casual User Series — The Ellipse Select Tool


Do you have minimal experience with GIMP, but would like to know more about the best tools to use for trimming photos? Are you interested in learning about the various options that make these tools easier to use? Would you like a method for making a decision about which tool is best for which type of job? If so, read on for an exploration of the third tool in this series— the Ellipse Select Tool.


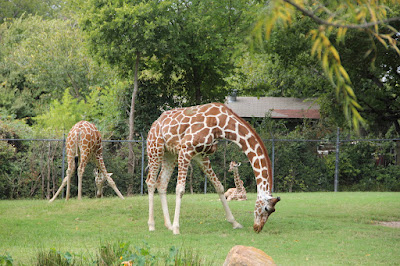
Giraffes Cropping Grass

For this article, as in the previous ones, I'll be using GIMP 2.8 and a photo of some giraffes, which you can download by clicking on the picture. (When you get to the full-sized image, drag it and drop it on your desktop.) It is assumed that you have some basic knowledge about GIMP, such as how to invoke it and load an image, how to navigate the menus, and how to save a file. By the end of this article you should have a good feel for using the Ellipse Select Tool, along with all of its options that are applicable to cropping photographs.

06 November 2012

GIMP 2.8 Tutorial: Which Tool Should I Use to Crop a Photo? — Part 2

GIMP Casual User Series — The Rectangle Select Tool


Do you have minimal experience with GIMP, but would like to know more about the best tools to use for trimming photos? Are you interested in learning about the various options that make these tools easier to use? Would you like a method for making a decision about which tool is best for which type of job? If so, read on for an exploration of the second tool in this series— the Rectangle Select Tool.

Giraffes Cropping Grass

For this article, as in the previous one, I'll be using GIMP 2.8 and a photo of some giraffes, which you can download by clicking on the picture. (When you get to the full-sized image, drag it and drop it on your desktop.) It is assumed that you have some basic knowledge about GIMP, such as how to invoke it and load an image, how to navigate the menus, and how to save a file. By the end of this article you should have a good feel for using the Rectangle Select Tool, along with all of its options that are applicable to cropping photographs.

17 October 2012

GIMP 2.8 Tutorial: Which Tool Should I Use to Crop a Photo? — Part 1

GIMP Casual User Series — The Crop Tool


Do you have minimal experience with GIMP, but would like to know more about the best tools to use for trimming photos? Are you interested in learning about the various options that make these tools easier to use? Would you like a method for making a decision about which tool is best for which type of job? If so, read on for an exploration of the first tool in this series — the Crop Tool.


Giraffes
Giraffes cropping grass

For this article, I'll be using GIMP 2.8 and a photo of some giraffes, which you can download by clicking on the picture. (When you get to the full-sized image, drag it and drop it on your desktop.) It is assumed that you have some basic knowledge about GIMP, such as how to invoke it and load an image, how to navigate the menus, and how to save a file. By the end of this article you should have a good feel for using the Crop Tool, along with all of its options that are applicable to cropping photographs.


20 September 2012

GIMP Tutorial: How to Make a Hexagonal Pattern

Introduction


I've always been fascinated by patterns. Over the past year I've been playing around with creating patterns from pieces of photographs. This is a fun exercise and can result in interesting, and sometimes beautiful, images.


In a previous tutorial I described how to make rectangular patterns. In this tutorial I'll explain how to make a hexagonal tile from a triangular cutout from a photograph and then show how to tile multiple hexagons to make a repeating pattern.


This tutorial is broken into the following sections:

GIMP
2.6.11 will be used for the main part of the work, but Inkscape 0.47 will be used at the beginning because it has a useful tool for quickly creating geometric objects.

See Also: If you are interested only in creating a hexagonal shape in GIMP, see How to Create Regular Polygons in GIMP.